Showing posts with label planning. Show all posts

Sunday, 13 July 2014

Time Capsule Contents - July 2, 2014

July 2, 2014

Two weeks after the public opening of the time capsule I opened it again to start the conservation work necessary to record the objects as they are removed.  This photograph shows the tools I will use (starting from the far right):
Getting Ready

  • an exacto-knife with a larger flat blade, 
  • a probe flat on one end, pointed on the other, 
  • a metal ruler for measurements, and 
  • a pen and paper to take notes.

First thing was to take the capsule measurements:

  • 18.8 cm long, 11 cm wide, and 8.5 cm tall including the lid, 
  • 18.5 cm long, 10.5 cm wide, and 8.2 cm tall without the lid
The contents of the time capsule are (more details following):

  • 7 handwritten sheets of paper
  • 3 newspapers (details to come later)
  • one small business card - Dominion Atlantic Railway 
  • one large business card - Town of Kentville

The capsule reacted strongly to a magnet implying that it has high iron content.  The exterior and interior does show patches of reddish coloured corrosion which is another clue to iron content.  The lid was made of a single flat piece of metal with notches in the four corners and folded over to produce an edge.  One of the consequences of this is that there are minute openings in each corner which could allow moisture to enter the capsule.  Moisture was evident on opening day on the paper observed.


Small business card
Handwritten pages - pinned together
The first thing I noticed upon opening the lid was that the handwritten sheets of paper folded on the top were now loose from the sides of the capsule.  It is likely that it dried out to the point where it came loose.  However, the newspaper below it was still attached to the sides.  The folded up, handwritten pages came out easily with no tearing.  On the other side a small business card in very bad shape was attached to the paper but came loose very easily.  It is not easily readable but does have two lines printed in the lower left corner: Dominion Atlantic Railway and Engineer and Mechanical Supervisor.  The person's name in larger lettering is printed in the middle.  All is obscured by black spots and general deterioration.  It is very fragile and requires special handling.

Carefully releasing edges
Below this was a folded up newspaper with some parts attached to the sides of the capsule.  I used an exacto-knife with a larger, flat blade to scrape along the sides to loosen the attached bits.  This was done all around the sides.  The newspaper came loose after a few minutes with minimal damage.  This newspaper was dated April 18, 1929, two months before the capsule was placed.

Beneath this was another newspaper.  I was able to loosen the newspaper using the exacto-knife.   It was dated June 19, 1929.  The date the capsule was placed.

What is in the bottom?
Below this was a third newspaper and unlike the others this one had attached itself to some parts of the capsule beneath it causing slightly more tearing.  This could not be loosened via an exacto-knife due to the location.   However, it came out with only minimal damage.  Some bits of newspaper are left intact in the bottom of the capsule along with a very well preserved business card for a Mr. Henry Morse Kentville Town Clerk and Treasurer.  Although some small pieces of the newspapers were torn on removal all the text is readable except for the pieces shown at the bottom which will be left as is.


In my next blog entry I will show details of the handwritten pages.  It is currently being transcribed by one of our museum volunteers.  I will also write about the inscription on the inside corner of the lid.  There are a few techniques that can be used with the right equipment to make the inscription clearer.

Friday, 19 October 2012

Treating Mouldy Objects - Planning - October 17, 2012

October 17, 2012

Several objects stored in the Kings County Museum started showing evidence of mould growth.  This was discovered by the curator and immediately dealt with.  The curator inspects objects at least twice every year watching for possible mould growth in order to catch it and deal with it before it spreads.  This is an ongoing issue in many museums and requires extra diligence.  All objects must be quarantined when they are donated to the museum for a period of time usually one or two months.  They are examined regularly and only enter the permanent collection when they show no evidence of mould or insects.  In Nova Scotia (as in United Kingdom) where the average annual relative humidity (RH) is over 80% mould growth can happen at any time.  General collections of objects are best stored at 65% RH.

I put together a list of steps to take in terms of cleaning up this mould outbreak.  The steps are based on a combination of advice from the Senior Conservator at Nova Scotia Museum, internet research, and my studies at the university.  The objects were bagged in plastic and stored in a freezer then removed and kept in room temperature still bagged for at least 24 hours beforehand.  The following steps were discussed and approved by the curator before proceeding:
  1. hang up the objects on a line outside in direct sunlight preferably with a bit of wind for 6 to 8 hours - make sure that they are not hung up near intakes for air conditioning or open windows into the building
  2. brush off the objects with a soft, small paint brush first one direction and then the other - repeat this step after 2 or 3 hours - when done, brush must be soaked in bleach and water solution for at least 20 minutes, rinsed and dried OR thrown away
  3. mix Orvus soap (discussed in previous post) with distilled water in a small bowl using only one teaspoon or less of soap, thoroughly mix it
  4. using a natural sponge lightly damp wipe the object with the Orvus solution first one direction and then the other - sponge must be soaked in bleach and water solution for at least 20 minutes and dried when done OR thrown away
  5. using a natural sponge lightly damp wipe the object with distilled water first one direction and then the other
  6. repeat above step
  7. hang up the damp objects on a line outside in the sun for several hours until thoroughly dry (again, windy would be best
Note: latex gloves and a face mask were used for all steps where mould spores may be present. 

The objects in question were a collection of military hats primarily from World War II but of particular interest is one from the Boer War which is over 100 years old.  Below is a photograph of all of the objects.  Later photographs will show them in more detail.


Wednesday, 17 October 2012

Roundhouse Objects Conservation - Oct. 16, 2012

October 16, 2012

Assessment Finished

 I completed the assessment of all the railway roundhouse objects and am preparing the spreadsheet with the information needed by the curator to discuss and approve the steps to proceed.  In general, the conservation will be basic cleaning, stabilization of most of the metals but not the very large ones, preparation of storage materials, and entering the data on the collections database.  More on this in a later BLOG.


The two photographs above show a group of objects that will not be conserved but will be given away to local railway history collectors.  The reasons for giving them away:
  1. they are considered not "historically significant",
  2. they are in considerably bad shape - lots of corrosion which is heavily flaking as seen in the photographs,
  3. they are in some cases duplicates of objects already in the museum's collection,
  4. they will save space in storage in a limited storage area (this is common in community museums).
In November 2012 the curator and I will travel to a nearby railway collector and offer these objects to them.  I am looking forward to this as part of my education on the history of the Dominion Atlantic Railway.  The history will help me fill out the historic records for these objects and becomes part of the body of work kept at the museum and stored electronically on the collections database.

The next step, beginning next week, is to start the conservation work.  This will mean cleaning all the objects using fine brushes, cloth, and soap for surface cleaning. Distilled water will be used for rinsing and for mixing with the soap.

Conservation Tip: Many objects can be washed or damp wiped with soaps that are pure in nature.  That is, do not have any other chemical additives such as dyes.  Orvus is an example of a synthetic, neutral, gentle, effective cleansing agent and is often used to wash or damp wipe or soak textiles of all kinds such as quilts but must be used carefully since some colour dyed materials have the potential to run.  Any coloured materials must be tested for colour fastness first before proceeding.  Usually I will soak a Q-tip in distilled water and rub it with moderate pressure on coloured material in an area not readily visible.  If any of the colour rubs off on the Q-tip I will not clean that coloured area.  Please check the Material Safety Data Sheet  (MSDS) of any cleansing product to determine safe handling and potential health issues before proceeding.  This web page has that information for Orvus and where to obtain it

http://www.pgpro.com/Default.aspx?tabid=88&product=93

Friday, 12 October 2012

Roundhouse Objects Conservation - Oct. 9, 2012

October 9, 2012

Assessment (Continued.....)


Large locomotive wrench
I finished off assessing the large group of objects including this large wrench shown on the right which was used on locomotives.  The scale in the photograph (black and white bar at bottom centre) is 11 cm (about 4 inches) long which shows how large it is.  There are yellowish white pock marks on the wrench which are of unknown origin.
Heavily corroded padlock
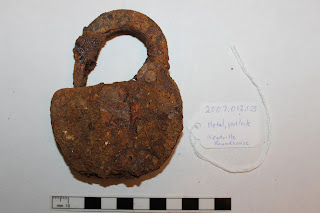
There is a very corroded (rusted) padlock shown on the left that may have a makers mark that could be revealed by removing the loose layers of corrosion.    Once again, makers marks can help provide history of the object and date it.  The padlock is frozen in the position shown - it does not move when minimal pressure is applied.

There were two glass objects assessed: a clear glass lid for a compote jar and a glass insulator for a power line.  It is not clear if the glass lid was imported from elsewhere or made locally.  It may be possible to determine this when it is cleaned and compared to some similar objects currently in the museum's locally made glass collection.

Conservation Tip: For all metals I am proposing that I remove all loose rust and apply a fine layer of museum grade wax heated with a hair dryer and applied with a brush.  This will stabilize the object to avoid it deteriorating any further.  In the top photograph you can see some flecks of corrosion which come off when handled.  This would not happen if treated as I propose.  The coating of wax would block contact with moist air yet allow the object to be viewed.  The wax is easily removed by reheating with a hair dryer and wiped off with a clean cloth.  There were two other metal objects assessed at the same time: a brake wheel and three rail spikes.  All will require the same treatment.  Caution: Most metals expand when heated and contract when cooled so it is important to make sure that the metal objects are stable and can withstand a minor amount of heat such as with a hair dryer.


Tuesday, 9 October 2012

Roundhouse Objects Conservation - Oct. 2, 2012

October 2, 2012

Assessment (Continued......)

Roundhouse Objects Large Group
Continued with the assessment of the large group of objects as shown on the left.  I am working in numerical order from the documentation provided by the environmental review company and mostly  from left to right in this photo.  I got through 12 objects which were mostly part of the tea serving sets used on the Dominion Atlantic Railway. As I work my way through these it is obvious that cleaning and proper storage will be most important.  Cleaning will provide the following benefits: preparation for storage, no more loss of material with handling, and uncover makers marks.  Storage is critically important to these objects because they are fragile and currently are only wrapped in thin white or brown paper and loosely placed in a large plastic box.  The objects do not roll around or knock against each other in the box, they are somewhat firmly packed in.

Conservation Tip: I will recommend that each object be wrapped in cotton batton and placed in a better box.  Both boxes and cotton batton can be easily and cheaply obtained at a local dollar store.  I would also recommend this for anyone at home who may have fragile objects stored away.  Although using acid free boxes for storage and the use of museum grade materials of all kinds would be better they are much more expensive.

Several of these pieces have makers marks which can be used to research the supplier.  It is this research that can shed light on the manufacture and usage of these which can also shed light on local customs.  Certainly, the more expensive the ceramics the more wealthy and the higher the social status of the client.  There are similarities in the makers marks in this collection but some variations.  Perhaps they were purchased at different times and may reflect change in ownership of the company that made them.  All appear to have been made in the United Kingdom.  Since the railway was in operation from the late 1890's until the 1960's there will be some supplier history available.  In the earlier years of operation a more wealthier client could afford to take the train from Yarmouth to Halifax and beyond while dining in the dining car and enjoying the view out the window of the beautiful Annapolis Valley.  Below is an example of a makers mark - Grindley England Vitrified supplied by Nerlich & Co - on a butter dish.  Nerlich & Co was an importer based in Toronto that was active from 1858 until at least the 1940's.

Butter Dish with makers mark


Tuesday, 2 October 2012

Roundhouse Objects Conservation - Sep. 25, 2012

September 25, 2012

Assessment (Continued....)

Roundhouse Objects Large Group
This work continued from Day 1 with the larger group of objects as shown in the photo to the left: 28 in total consisting mostly of ceramics and glass.  The glass consists mainly of bottles of various shapes and sizes with many makers or company marks which will assist with identification and dating. The ceramics are mostly broken which suggests they were just thrown away.  Surface cleaning is suggested for all.  I managed to get through the assessment on half of them which have a lot of surface dirt (soil) and some red colouration on the ceramics.  This implies they were dug up from the soil which is predominantly red in the area where they were found.  I tried removing a very small speck of red on one of the ceramic pieces with a Q-tip and distilled water and it came right off with very little pressure.

Conservation Tip: I have made a note that the ceramic pieces could all be wiped off with distilled water and a cloth.  Distilled water is used to minimize contact with water of unknown mineral content.  Q-tips can be used to clean in some of the hard to get areas.  One of the benefits to cleaning is to minimise the amount of material that will rub off or fall off during handling and preserve it for future testing if needed.  All material removed when cleaned will be saved and stored with the objects to facilitate any possible future testing or analysis.  We can never be sure what may be important in the future, perhaps a 100 years from now?

The museum has a large collection of the ceramics (dishes) used by the Dominion Atlantic Railway during its "hey day" so only a minimal amount of clean-up work is necessary on these ceramics to make them presentable for a future exhibit and for storage.  For those interested in seeing the intact dishes including a full setting there are examples available for viewing at the Kings County museum.

There are three metal objects: a lock, three spikes, and a wheel which are very rusted.  These can be carefully cleaned and then a fine coat of conservation grade wax (much more pure) applied with a fine brush and a hair dryer to stabilise them.  The wax acts as a coating to prevent contact with moist air and is easily removable by reheating and wiping off with a cloth.

Here is a photograph of a broken ceramic piece that shows the dirt (soil) and rust patches:

Ceramic jar lid