Showing posts with label metal. Show all posts

Saturday, 19 April 2014

Silver Artifacts Conservation - April 17, 2014

April 17, 2014

Small trophy - full view - before
Tarnish is formed on the surface of silver when it is subject to high humidity, moisture or air pollution.  The silver combines with sulphur in the air or moisture to form silver sulfide (AgS) which is black in colour.  Removing this black material is usually done by polishing with a soft cloth.  Silver is easily scratched when polished.  In fact, no matter what you use to polish it there will be minute bits of silver worn away each time you polish often only visible by using a microscope.  Over time this will become a critical issue with silver laminates since the silver itself can be worn down to the base metal.  Not only do the scratches become unsightly but then you may have the brass colour showing through in some other parts of the artifact.  Often the base metal is a copper alloy such as brass but can be many other types of metal.  This photograph shows a trophy with a black sheen of tarnish, silver laminate on a copper alloy base, dust on the wooden base, and a strip of scotch tape.  The tape was loosely attached at the top back edge (reason unknown).

Small trophy - close-up - before
Conservation of silver involves several steps but the intent is to avoid  or at least minimize scratching the surface.  This is accomplished by using the softest materials readily available and a few simple techniques.  There are many commercial silver polishes available that are widely used and certainly perform the polishing quite readily.  However, what many conservators use is precipitated calcium carbonate which is a more pure form of chalk that is very gentle in the polishing process.  This material can be purchased relatively cheaply at most pharmacies.  You need very little every time perhaps only a tablespoon which you mix with distilled water to make a paste.  So the combination of the chalk with no impurities and a pure form of water will combine to make a polishing substance with very limited chance of scratching.

Small trophy - close-up - after
Small trophy - full view - after
Always use nitrile gloves to handle the silver to reduce contact with the oils, salts, and ammonia found on skin.  With every artifact the first step is to gently wipe the surface with a soft cloth to remove dust or any other grainy substances that may be present.  Moistening the cloth with distilled water may be done as well.  The polishing paste is then applied to the silver artifact with a soft cloth.  I apply it gently in a circular motion over the area to be polished.  I usually do this twice and find that in most cases there is still a bit more tarnish removed a second time. The polishing process is finished by a gentle wiping with a clean soft cloth. Again, the cloth can be moistened with distilled water.  

Lastly, the best way to store silver is wrapped in acid free paper within a tightly sealed polyethylene bag and at a relative humidity of 40% or less.  There are some conservation grade treatments that can be applied as a layer to the surface.  Also, there are anti-tarnish strips that can be stored in the bag with the artifact wrapped in the acid-free paper so it does not come in contact with the strips.

These photographs are of a trophy that was conserved in this manner.  This trophy dates from 1950 and was awarded during the Apple Blossom Festival in Kentville Nova Scotia Canada.


Sunday, 9 February 2014

Prescott House Metal Objects - February 9, 2014

February 9, 2014

Prescott Hose - Archaeological dig, Fall 2013
In a previous post I showed how I re-assembed a glass bottle that was found in pieces at an archaeological dig at Prescott House, near Wolfville, Nova Scotia.  The first photograph here shows us working on the dig.  We were in a class at Acadia University learning about archaeology and history in the area.  The three of us on the left are working in an area that appeared to be part of the wall or foundation of a building.  The original house from the early 1800's can be seen in the background at top right.  Behind us is a road to a grounds keeper's shed.

I was given the opportunity to work on four metal objects that were found at the same location.  These are a belt buckle, ice creeper (not discussed here), button, and bone handled knife.  Each of these came to me in a plastic bag labelled with the location in which it was found and still immersed in the original soil in which it was found.  This is the best way of removing these from their original location because it allows me to assess the impact of separating them from their environment and perhaps, if budgeting permitted, to get the soil analyzed.  For precious objects this would be a necessary exercise to determine the best route of treatment.  The constituents of the soil would help make the decision on which chemicals to use for cleaning, preventive measures, and storage.  Since, in this case, we are dealing with a limited budget and non-precious objects (objects of lower value) this was not done.  However, it does not stop us from doing some basic conservation work on these interesting objects.

I have provided photographs of three of these showing before images in which you can see the results of cleaning.  There are several important lessons to be learned from this work.  All these had a very serious amount of corrosion products in an active state.  This was the result of many years where they were immersed in soil and sand subject to rain and snow with alternating freezing and thawing conditions typical of Nova Scotia.  All of which exert considerable stresses.


Bone-handled Knife
The bone handled knife was the best example of the stresses of moisture.  It was moist when it was removed from the soil and rapidly dried out.  One part of the bone handle came loose within minutes.  I suspect the moisture was holding it together.  This is repairable with the same adhesive used to reassemble the bottle in my previous post, Acryloid B72 restoration adhesive.  The blade of the knife was obviously broken at the end with a jagged edge.  There is an obvious pattern to the material showing as a layer over much of the blade.  I suspect that this was the sheath in which the blade was kept.  Very little cleaning was done on the blade to preserve this material for possible future testing.  All loose material was carefully brushed off  and the wax applied overall as a preventive measure.  The wax had the added benefit of sealing up many small fractures in the bone and making them much less visible

Buckle - front - before cleaning
Buckle - Front - Finished
The buckle shown here was a mass of corrosion, sand, soil, and plant root.  The layers of corrosion were heavy enough that it could not be completely cleaned off.  No parts of it was movable and the underlying metal is not visible at all.  Once again, any loose material was carefully removed and a layer of wax was applied.  This object reacts strongly to a magnet so is likely made of iron.


Button - Back - Finished
Button - Back - Cleaned
The button shown here proved to be one of the more interesting objects to work on because after cleaning and treatment a very clear pattern became visible on the back.  It is characteristic of fibres in cloth suggesting that this is either the remnants of the material the button was sewn onto or a piece of cloth it was laying next to while in the ground.  I did very little cleaning of this side - using only a very fine, soft brush to ensure that none of this material would be removed.  It is possible that in the future someone may wish to have the material removed and examined so preserving it was my priority.  The front had a pattern of two small circles and bumps but was very obscured due to corrosion.  The condition was such that we cannot identify a date or its usage.  Once again, a fine layer of museum grade wax was applied to seal it from further moisture damage.

In all cases these metal objects were accompanied with a two page laboratory record document that provides a detailed description, measurements, structure, possible history, manufacture, treatment applied, before and after photographs, storage and exhibit environmental control suggestions, and any other additional notes that were relevant.  These documents becomes part of the permanent record for the province of Nova Scotia and Prescott House the owners of these important objects.


Sunday, 9 June 2013

Roundhouse Objects Conservation - June 4 2013

June 4, 2013

I will not be at the museum for the next two weeks and will do more posts starting in the fall.  The next updates will discuss how to store the roundhouse collection using lower cost materials to ensure that they can be safely stored away for both long term and short term.

Railway Equipment Maintenance Tools


Locomotive tool with markings after sealing.
I finished the treatment of the two tools described in the last post by applying a layer of wax to stabilize them.  They are now both sealed from moisture and flaking from handling.  I have had several visitors to the museum on the Tuesday that I am there working on objects and was able to show the visitors how I apply the wax and discuss the usage of these tools.  Thus far, they are proving to be of interest and are an effective teaching tool.  They are ready to be handled and shown to visitors or stored away for future exhibits.  The photograph on the right shows the locomotive tool with the etched letters DAR and CS.  You can see the fine layer of wax which does not obscure the markings nor the other unevenness of the metal.  The two photographs below show an example of the tools used and material removed from the greasing tool as I was working on it and then an example of the same area after it has been sealed with the fine layer of wax.


Greasing tool with the tools I used to remove corrosion.
Greasing tool after treatment, same area.


Roundhouse Objects Conservation - May 28 2013

May 28 2013

I have been updating the public database NovaMuse.ca with any additional information such as research, photographs, updates and so on.  The challenge has been to get the work done on the larger objects.  I have been working on the objects pictured below.  Normally for objects of this size a simple, general clean would be done and then store them away.  However, in this case, these objects work well as teaching tools for education in maintenance procedures and the tool usage by maintenance staff in the early days of railroads in Annapolis Valley.  Therefore, I have elected to carefully brush away and pry loose as much of the corrosion as I can and then apply a layer of wax to seal these from moisture and facilitate handling and storage.  I have documented these procedures on metal objects in detail in the past so won't repeat them here.

It is likely that the first tool below was used on locomotives.  It fits nuts of 4.0 cm at one end and 4.5 cm at the other.  It is S shaped to fit in tight situations.  It has the letters DAR etched at each end just below the bottom of the U on both sides which stands for Dominion Atlantic Railway.  Just a short distance down the handle are the letters CS which I have asked local railway collectors about.  The theory is that this stands for Car Shop.  In other words railway car shop.  I know from previous research that, in the past, employees would etch their initials in tools that they owned when an employer insisted that employees supply their own tools.  It was a source of pride for craftsmen to have their own tools.

Locomotive Wrench


The second tool below was used to open the lid on a greasing box above the wheels of a rail car and then used to pack in grease.  The wheel bearings were checked regularly by the maintenance staff in case they were heating up due to the friction when the grease was running low.  Overheating could cause breakdown of the bearings and potentially lead to a derailment.  This tool was essential to the safe operation of the railway.  It does not have an etched marks.


Bearing Grease Tool

Wednesday, 19 December 2012

Roundhouse Objects Conservation - Dec. 18 2012


December 19, 2012

Metal Objects Conservation....continued

In a previous post I showed how I clean up corrosion products (rust) and other material from metal objects that were found in soil under moist conditions.  I mentioned that I consider this as a two step process in that once cleaned (Step One) these objects should be stabilised (Step Two) to prevent further deterioration due to the possibility of high relative humidity.  Of course, the cleaning process has the side effect of exposing more of the metal surface to moisture and oxygen thereby promoting the accumulation of corrosion products (rust).  I use conservation grade wax to coat the objects to provide a barrier to contact with moisture and oxygen combination thus ensuring that they will last a considerable time into the future.  Not all objects would be treated this way but certainly most smaller objects can be.  Particularly those with high iron content since they are susceptible to rusting.  It is not practical to do this with larger objects as you will see by the techniques I use.  I prefer to use Renaissance Micro-crystalline Wax since it is pure and safe to use on most objects plus the added benefit of being developed by the British Museum for use on a wide range of historical objects such as furniture, leather, ivory, onyx, marble, metals, and so on.  For non-metals, it is typically applied as a thin layer and then buffed with a soft cloth.  For metals, it is often used over top of an anti-corrosion undercoating.  For our purposes in a small, community museum setting it is not always affordable to purchase anti-corrosion undercoating so simply applying a layer of this wax will serve to protect the object at minimal cost.  I use heat sparingly applied to the wax and object to help smooth it into a thin, uniform layer.


Back of padlock with tools and materials used to apply wax.
Before heating, I apply a thin layer of wax to the object with a small, coarse bristled brush. I then apply minimum heat via a hair dryer or heat gun to melt the wax and brush it again to remove lumps and ensure low spots and all the surface is covered in a thin layer.  The heat source must be carefully applied to ensure that it is not too hot to handle.  In the photograph to the right you can see the tools and materials I used to treat the padlock.  I placed the object on a wooden cutting board as a neutral material which would not readily conduct the heat.  I used a paper towel (above the brush) to clean excess wax off the brush.  I find that in a short time the object becomes quite warm to the touch.  Keep in mind that most metals expand when heated and contract when cooled so it is best if the objects to be treated are comprised mostly of iron rather than an alloy since different metals expand and contract at different rates.  Alloys for the most part would be handled differently.

In the photographs below I show the railway padlock I worked on with the wax applied before it was melted and then after it was melted so you can see the difference.  The brush is the right tool to use since it aids in getting right into all the depressions and allows for us to smooth out the excess wax around all the bumps, cracks, edges and depressions.

Padlock with wax heated and smoothed
Padlock with wax applied before heat


The edges, rivets, depressions, lettering, and contrasting colours are all still visible after the wax is applied and smoothed by applying heat.  The object on the right is now protected from moisture, oxygen, oils from handling, pollution and so on.  It can be safely packaged, stored away, and maintained in this condition for many, many years.

Conservation Tips: Treating simple metal objects can be done with minimal time and cost as shown above.  Reversing the process is relatively simple by carefully reheating the object and wiping off the wax with a soft cloth.  I suggest wearing gloves such as oven mitts that will protect your hands from the heat applied and using a thin board as a working base.  As with most objects it is always a good idea to consult with a trained conservator beforehand who can assess the object, determine the best treatment, and provide an estimate of the cost.  The above treatment has been done successfully on railway spikes, a railway valve wheel, a padlock and these archaeological objects: hand made nails, a key, a short length of chain, a shoe buckle.

Thursday, 13 December 2012

Roundhouse Objects Conservation - Dec. 11 2012

December 13 2013

Metal Object Cleaning....Continued

One of the larger metal objects found at the railway roundhouse site in Kentville Nova Scotia is a wheel that was likely used to open and close a valve.  Perhaps, even, as part of a piece of steam equipment.  It came to the museum labelled as a brake wheel but the diameter is 22.5 centimetres which makes it quite a bit smaller than most brake wheels I have seen in photographs.  There are other clues to its possible usage that I will point out later.  It was heavily crusted with corrosion products (rust) so my effort was, as with other metal objects, to remove any loose material in preparation for applying a layer of wax to seal off the surface from moisture.  All material removed was saved in a sealed glass container.  Also, as before, the hope was to make clear any makers or other marks on the object.  There are some raised, embossed material possibly letters near the centre.  Of particular interest is what appears to be some small pieces of textiles (cloth) on the outside of the wheel and around the nut on one side of the short, threaded shaft running through the middle.  The opposite end of this shaft appears to be broken with a crack visible.  Was a cloth used to turn the wheel and torn or was the object thrown away along with some cloth?  We will likely never know.  Below are photographs of both sides of this object:


Wheel before cleaning with cracked bolt in centre
Wheel before cleaning with rusted nut in centre

Wheel material cleaned off and tools used.
The surface of the wheel had a sheen of grey and red corrosion some of which was very soft and easily came off with a toothbrush with hard bristles.  Quite a lot of larger crusted material was easily pried off with a scalpel.  There were a couple of bead shaped bumps to the right of the nut in the centre which were not removed.  They are reminiscent of material sprayed about during arc welding which I have observed in the past while helping my father with some of his welding projects.  The photograph to the right shows the tools and the material removed.  The textile (cloth) pieces can clearly be seen.

Wheel centre close-up showing faint lettering.
One of the benefits to this type of cleaning is the ability to bring out any marks found on the object.  In this case I was able to show the word Crane which is a maker of all sorts of equipment and tools plus the word Open with what looks like a line with a very faint arrow at the end.  The photograph to the right shows these faint marks.  Certainly, these marks imply it is a valve wheel rather than a brake wheel since some brake wheels usually have the words ON and OFF in different points along the wheel.

Wednesday, 28 November 2012

Roundhouse Objects Conservation - Nov. 27, 2012

November 27, 2012

Metal Objects Cleaning

Metal objects are challenging to clean.  There are several examples as part of the railway roundhouse collection that I can prepare for long term storage and display.  Two of them at least at first appear particularly difficult but in the end are not so hard to do.  In this post I will show you how this can be done.  There are two steps to this process: 1) cleaning and 2) preventive maintenance.  I will concentrate on the cleaning in this post and discuss the second step in a later post.  The metal objects all have some corrosion products (rust) in various degrees.  When I say difficult I mean that they are heavily corroded.  Why clean them at all?  It is to reveal any markings such as makers marks, copyright marks, registration numbers and so on.  All of which will help us to date them and determine how they were made and used.

Keep in mind that I will avoid the use of chemicals in the cleaning process and prefer to use mechanical means.  Therefore, the tools I use in cleaning these are as follows:
  • brushes: usually a toothbrush with stiff bristles for removing dust and smaller material,
  • picks: usually toothpicks and shish-kabob sticks for scraping (to avoid scratching),
  • scalpel: usually used to pry off loose material

Padlock - before cleaning
Padlock - after cleaning, closeup


The object on the left is a padlock used by the railroad. We know from other examples in much better shape that there is usually embossed lettering on the key hole cover which runs vertically down the centre of the main body of the lock. It is obscured and unreadable in the photograph on the left. By using a scalpel I was able to carefully remove large chunks of corrosion material to reveal the marking as shown on the right in a close-up photograph. I used the toothbrush to remove dust and other smaller, loose material to make the lettering even more visible. The embossed letters "CPR" vertically down the key hole cover can clearly be seen.

Canadian Pacific Railway (CPR) on November 13, 1911 leased the operations of the Dominion Atlantic Railway (DAR, incorporated on October 1, 1894) effectively taking ownership, although DAR maintained its own identity for most of its existence.  Therefore we can date this padlock to sometime after 1911.  Eventually all (or most) padlocks with the letters DAR were replaced with CPR lettering.  There is also a registration number on the back of the hasp (not shown here).

The photograph below shows the material removed, the tools used (toothpicks and shish-kabob stick not shown), and the end result - a cleaned up padlock.


Conservation Tips: Be very careful when using sharp tools such as a scalpel (besides the ever present safety issue) by keeping in mind that it is very easy to scratch the metal object.  I carefully used the scalpel to pry material loose not to scrape it.  That is, I insert the sharp edge in cracks and pry it up, leveraging the blunt edge.  The photograph above shows several very large pieces that came loose.  Certainly, it is more time consuming to do it this way but I find that a combination of prying carefully followed by brushing with the toothbrush works best and alternating this back and forth as many times as needed for the desired result. The wooden picks can be used for scraping but again, be careful.  In this example, the corrosion was generally very loose and relatively easy to remove.  Consult a conservator to determine how far to go with the removal of corrosion who will remind you that scratches may result if you go too far.  The next step is to coat the object with museum grade wax to prevent further corrosion by sealing it off from contact with moisture.

Friday, 12 October 2012

Roundhouse Objects Conservation - Oct. 9, 2012

October 9, 2012

Assessment (Continued.....)


Large locomotive wrench
I finished off assessing the large group of objects including this large wrench shown on the right which was used on locomotives.  The scale in the photograph (black and white bar at bottom centre) is 11 cm (about 4 inches) long which shows how large it is.  There are yellowish white pock marks on the wrench which are of unknown origin.
Heavily corroded padlock
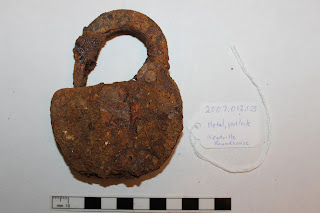
There is a very corroded (rusted) padlock shown on the left that may have a makers mark that could be revealed by removing the loose layers of corrosion.    Once again, makers marks can help provide history of the object and date it.  The padlock is frozen in the position shown - it does not move when minimal pressure is applied.

There were two glass objects assessed: a clear glass lid for a compote jar and a glass insulator for a power line.  It is not clear if the glass lid was imported from elsewhere or made locally.  It may be possible to determine this when it is cleaned and compared to some similar objects currently in the museum's locally made glass collection.

Conservation Tip: For all metals I am proposing that I remove all loose rust and apply a fine layer of museum grade wax heated with a hair dryer and applied with a brush.  This will stabilize the object to avoid it deteriorating any further.  In the top photograph you can see some flecks of corrosion which come off when handled.  This would not happen if treated as I propose.  The coating of wax would block contact with moist air yet allow the object to be viewed.  The wax is easily removed by reheating with a hair dryer and wiped off with a clean cloth.  There were two other metal objects assessed at the same time: a brake wheel and three rail spikes.  All will require the same treatment.  Caution: Most metals expand when heated and contract when cooled so it is important to make sure that the metal objects are stable and can withstand a minor amount of heat such as with a hair dryer.