Sunday, 30 December 2012

Roundhouse Objects Conservation - Dec. 27 2012

December 27, 2012

Historical Object Photography

My conservation work on the Kentville Railway Roundhouse objects is nearing completion of the cleaning phase with only a few objects left to work on.  I have started taking photographs to upload to the Kings County Museum collections database called www.novamuse.ca.  The museum is now closed for the winter (opening again in mid-March 2013) so this gives me an opportunity to add all the roundhouse objects information onto the database and include higher resolution photographs which I took on Thursday December 20.  Conservators refer to historical object photography as record photography.  Our goal is to produce photographs that allow viewers to see the objects as much as possible in their natural state that shows their true colours, shape, identifying marks, and condition and for researchers to zoom in for as much details as possible for such things as maker's marks.  Since we do not have a true photographic studio we have used what equipment we have on hand as donated to the museum or what photographers are willing to lend us.  The photograph below is the set up I used for this purpose.  The essential and basic pieces of equipment as shown are: a DSLR camera, a tripod, a light box, spotlights, and a scale (not shown here).  The light box in this case provides a white background on all sides as well as top and bottom.  The light box is a portable one that is easily assembled from a folded up state.  

Record photography light box set up
I found that 4 spotlights worked best: two at the top and one on each of the left and right sides.  All are angled towards the middle where the object will be placed.   The spotlights are not ideal but work reasonably well for our purposes.  It would be best to use a type of light that is diffused.  That is, not so focused, but we had none available at this time.  The spot lights are set up to not touch the sides of the light box because they get quite hot.  You can see in this photograph how the object is placed in the middle with white sides all around and soft light throughout.  It is best to remove all other sources of light such as overhead lights and from windows which can reflect off the objects.

Here are some of the guidelines I use when taking record photographs of historical objects:
  1. use a DSLR (Digital Single Lens Reflex) camera where possible although some point and shoot cameras do work well.  I have used a Canon PowerShot with good results,
  2. most objects can be photographed at about a 45 degree angle,
  3. use the largest sized JPEG setting or RAW setting but remember that RAW takes up considerable space,
  4. use custom white balance (photograph the white space anywhere in the light box and use it to set the white balance),
  5. position the lights to highlight the object with as little reflection as possible,
  6. use macro setting for close up of identifying marks if there are any,
  7. use a scale nearby but not touching the object,
  8. angle the object if it highlights any markings otherwise they should be straight vertically or horizontally,
  9. take at least four photographs: one from the top the other from the bottom both with and without the label.
Below is an example of the photographs I took of a power line insulator.  Each one has the label shown beside it where the accession number can be used to do a search on www.novamuse.ca to get additional information.  I usually take the same pictures without the label to put on the database.  Having the label here simply makes it easier for anyone to do follow up on research if they are starting from this BLOG.  In this case the accession number on the label is 2007.012.021
Power line insulator - top
Power line insulator - bottom
Do-it-yourself Tip: In the past I have made a small light box when a commercial one is not available.  You can use a large box placed on one of its long sides.  Cut openings on the two narrow sides and top (the other long side) and cover the openings with white tissue paper.   I have then used ordinary lamps (desk lights) shining through the tissue paper as lighting.  Place a sheet of white paper large enough to cover the back and curve onto the bottom.  Place the object in the middle of this to take your photographs.

Wednesday, 19 December 2012

Roundhouse Objects Conservation - Dec. 18 2012


December 19, 2012

Metal Objects Conservation....continued

In a previous post I showed how I clean up corrosion products (rust) and other material from metal objects that were found in soil under moist conditions.  I mentioned that I consider this as a two step process in that once cleaned (Step One) these objects should be stabilised (Step Two) to prevent further deterioration due to the possibility of high relative humidity.  Of course, the cleaning process has the side effect of exposing more of the metal surface to moisture and oxygen thereby promoting the accumulation of corrosion products (rust).  I use conservation grade wax to coat the objects to provide a barrier to contact with moisture and oxygen combination thus ensuring that they will last a considerable time into the future.  Not all objects would be treated this way but certainly most smaller objects can be.  Particularly those with high iron content since they are susceptible to rusting.  It is not practical to do this with larger objects as you will see by the techniques I use.  I prefer to use Renaissance Micro-crystalline Wax since it is pure and safe to use on most objects plus the added benefit of being developed by the British Museum for use on a wide range of historical objects such as furniture, leather, ivory, onyx, marble, metals, and so on.  For non-metals, it is typically applied as a thin layer and then buffed with a soft cloth.  For metals, it is often used over top of an anti-corrosion undercoating.  For our purposes in a small, community museum setting it is not always affordable to purchase anti-corrosion undercoating so simply applying a layer of this wax will serve to protect the object at minimal cost.  I use heat sparingly applied to the wax and object to help smooth it into a thin, uniform layer.


Back of padlock with tools and materials used to apply wax.
Before heating, I apply a thin layer of wax to the object with a small, coarse bristled brush. I then apply minimum heat via a hair dryer or heat gun to melt the wax and brush it again to remove lumps and ensure low spots and all the surface is covered in a thin layer.  The heat source must be carefully applied to ensure that it is not too hot to handle.  In the photograph to the right you can see the tools and materials I used to treat the padlock.  I placed the object on a wooden cutting board as a neutral material which would not readily conduct the heat.  I used a paper towel (above the brush) to clean excess wax off the brush.  I find that in a short time the object becomes quite warm to the touch.  Keep in mind that most metals expand when heated and contract when cooled so it is best if the objects to be treated are comprised mostly of iron rather than an alloy since different metals expand and contract at different rates.  Alloys for the most part would be handled differently.

In the photographs below I show the railway padlock I worked on with the wax applied before it was melted and then after it was melted so you can see the difference.  The brush is the right tool to use since it aids in getting right into all the depressions and allows for us to smooth out the excess wax around all the bumps, cracks, edges and depressions.

Padlock with wax heated and smoothed
Padlock with wax applied before heat


The edges, rivets, depressions, lettering, and contrasting colours are all still visible after the wax is applied and smoothed by applying heat.  The object on the right is now protected from moisture, oxygen, oils from handling, pollution and so on.  It can be safely packaged, stored away, and maintained in this condition for many, many years.

Conservation Tips: Treating simple metal objects can be done with minimal time and cost as shown above.  Reversing the process is relatively simple by carefully reheating the object and wiping off the wax with a soft cloth.  I suggest wearing gloves such as oven mitts that will protect your hands from the heat applied and using a thin board as a working base.  As with most objects it is always a good idea to consult with a trained conservator beforehand who can assess the object, determine the best treatment, and provide an estimate of the cost.  The above treatment has been done successfully on railway spikes, a railway valve wheel, a padlock and these archaeological objects: hand made nails, a key, a short length of chain, a shoe buckle.

Thursday, 13 December 2012

Roundhouse Objects Conservation - Dec. 11 2012

December 13 2013

Metal Object Cleaning....Continued

One of the larger metal objects found at the railway roundhouse site in Kentville Nova Scotia is a wheel that was likely used to open and close a valve.  Perhaps, even, as part of a piece of steam equipment.  It came to the museum labelled as a brake wheel but the diameter is 22.5 centimetres which makes it quite a bit smaller than most brake wheels I have seen in photographs.  There are other clues to its possible usage that I will point out later.  It was heavily crusted with corrosion products (rust) so my effort was, as with other metal objects, to remove any loose material in preparation for applying a layer of wax to seal off the surface from moisture.  All material removed was saved in a sealed glass container.  Also, as before, the hope was to make clear any makers or other marks on the object.  There are some raised, embossed material possibly letters near the centre.  Of particular interest is what appears to be some small pieces of textiles (cloth) on the outside of the wheel and around the nut on one side of the short, threaded shaft running through the middle.  The opposite end of this shaft appears to be broken with a crack visible.  Was a cloth used to turn the wheel and torn or was the object thrown away along with some cloth?  We will likely never know.  Below are photographs of both sides of this object:


Wheel before cleaning with cracked bolt in centre
Wheel before cleaning with rusted nut in centre

Wheel material cleaned off and tools used.
The surface of the wheel had a sheen of grey and red corrosion some of which was very soft and easily came off with a toothbrush with hard bristles.  Quite a lot of larger crusted material was easily pried off with a scalpel.  There were a couple of bead shaped bumps to the right of the nut in the centre which were not removed.  They are reminiscent of material sprayed about during arc welding which I have observed in the past while helping my father with some of his welding projects.  The photograph to the right shows the tools and the material removed.  The textile (cloth) pieces can clearly be seen.

Wheel centre close-up showing faint lettering.
One of the benefits to this type of cleaning is the ability to bring out any marks found on the object.  In this case I was able to show the word Crane which is a maker of all sorts of equipment and tools plus the word Open with what looks like a line with a very faint arrow at the end.  The photograph to the right shows these faint marks.  Certainly, these marks imply it is a valve wheel rather than a brake wheel since some brake wheels usually have the words ON and OFF in different points along the wheel.

Friday, 7 December 2012

Roundhouse Objects Conservation - Dec. 4, 2012

December 7, 2012


Glass, and Ceramics Cleaning......continued


Butter dishes with maker's marks
I continued the cleaning process on mixed objects of different materials this week.  The ceramics consisted of 5 butter dishes which just needed wiping with a soft cloth and Orvus soap mixed with distilled water followed by rinsing with distilled water and a different soft cloth.  The photograph to the right shows all five dishes displaying the makers marks. These objects are in relatively good shape but with some red, rust like staining patches and a few scratches.  The rust patches are clearly visible on the dish in the lower left of the photograph.  The flip side of these dishes have no markings.  Although they appear to be very simple and of little importance, they, in fact, give us a glimpse into the purchasing practices of the railway at the time and into the manufacturer.   All show that they were made in England and two show that they were supplied by Nerlich & Co. This is an import company founded in 1858 in Toronto by a German immigrant to Canada.  My research shows that they imported goods from Germany originally but expanded to include goods from England after 1908 and wholesaling throughout the maritimes and most of Canada after 1891.  We can see several different makers marks with four showing the company name "Grindley England",  "W.H.Grindley & Co" and "Grindley Hotel Ware" while one other simply says "Made in England".  These different marks represent different batches very likely purchased at different times. W.H. Grindley & Co (Ltd) was established in 1880 at Tunstall in Stoke-on-Trent England and remained in business until 1991 when they went into receivership and were bought out by Woodlands Pottery.

Bottle main body with crack
Bottle top with material deposit

Bottle interior material removed
I cleaned a large brown bottle which had some material deposited inside.  The first photograph above shows the main body of the bottle with a large crack in the middle before it was cleaned.  The second photograph above shows the top of the bottle before it was cleaned with material deposited along the neck and top of the main body.  The photograph to the right shows the material removed.  Again, I carefully removed whatever would come loose inside by using a shish-kabob stick and Q-tips attached to the end of it.  I then rinsed the inside and out with Orvus soap and distilled water followed by rinsing with distilled water.  I used several Q-tips to wipe off any leftover material from the inside.  The outside was wiped with the soap mixture and a soft cloth and then rinsed with distilled water and a different cloth.  I decided to keep the material removed in a separate, sealed container because it appears to have some material that may give a clue to what it originally contained. By keeping this material it would be possible to do testing to determine what it is at a later date if needed.  There are no makers marks or copyright marks of any kind on this bottle.  It is likely that it held alcohol of some kind, possibly wine.


Conservation Tip:  Material cleaned (removed) from an object should be stored in a sealed container made of inert material such as glass to preserve the contents in as original condition as possible.  In the example above I used a glass container with a glass top and a rubber washer to hold the glass stopper in place.  The rubber washer is not exposed to the material inside.  It was purchased at a local dollar store and cleaned with the soap mixture, rinsed with distilled water, and dried before use.

Wednesday, 28 November 2012

Roundhouse Objects Conservation - Nov. 27, 2012

November 27, 2012

Metal Objects Cleaning

Metal objects are challenging to clean.  There are several examples as part of the railway roundhouse collection that I can prepare for long term storage and display.  Two of them at least at first appear particularly difficult but in the end are not so hard to do.  In this post I will show you how this can be done.  There are two steps to this process: 1) cleaning and 2) preventive maintenance.  I will concentrate on the cleaning in this post and discuss the second step in a later post.  The metal objects all have some corrosion products (rust) in various degrees.  When I say difficult I mean that they are heavily corroded.  Why clean them at all?  It is to reveal any markings such as makers marks, copyright marks, registration numbers and so on.  All of which will help us to date them and determine how they were made and used.

Keep in mind that I will avoid the use of chemicals in the cleaning process and prefer to use mechanical means.  Therefore, the tools I use in cleaning these are as follows:
  • brushes: usually a toothbrush with stiff bristles for removing dust and smaller material,
  • picks: usually toothpicks and shish-kabob sticks for scraping (to avoid scratching),
  • scalpel: usually used to pry off loose material

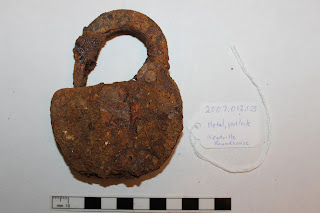
Padlock - before cleaning
Padlock - after cleaning, closeup


The object on the left is a padlock used by the railroad. We know from other examples in much better shape that there is usually embossed lettering on the key hole cover which runs vertically down the centre of the main body of the lock. It is obscured and unreadable in the photograph on the left. By using a scalpel I was able to carefully remove large chunks of corrosion material to reveal the marking as shown on the right in a close-up photograph. I used the toothbrush to remove dust and other smaller, loose material to make the lettering even more visible. The embossed letters "CPR" vertically down the key hole cover can clearly be seen.

Canadian Pacific Railway (CPR) on November 13, 1911 leased the operations of the Dominion Atlantic Railway (DAR, incorporated on October 1, 1894) effectively taking ownership, although DAR maintained its own identity for most of its existence.  Therefore we can date this padlock to sometime after 1911.  Eventually all (or most) padlocks with the letters DAR were replaced with CPR lettering.  There is also a registration number on the back of the hasp (not shown here).

The photograph below shows the material removed, the tools used (toothpicks and shish-kabob stick not shown), and the end result - a cleaned up padlock.


Conservation Tips: Be very careful when using sharp tools such as a scalpel (besides the ever present safety issue) by keeping in mind that it is very easy to scratch the metal object.  I carefully used the scalpel to pry material loose not to scrape it.  That is, I insert the sharp edge in cracks and pry it up, leveraging the blunt edge.  The photograph above shows several very large pieces that came loose.  Certainly, it is more time consuming to do it this way but I find that a combination of prying carefully followed by brushing with the toothbrush works best and alternating this back and forth as many times as needed for the desired result. The wooden picks can be used for scraping but again, be careful.  In this example, the corrosion was generally very loose and relatively easy to remove.  Consult a conservator to determine how far to go with the removal of corrosion who will remind you that scratches may result if you go too far.  The next step is to coat the object with museum grade wax to prevent further corrosion by sealing it off from contact with moisture.

Thursday, 22 November 2012

Roundhouse Objects Conservation - Nov. 20, 2012

November 20, 2012

Glass Objects Cleaning

There were several bottles recovered from the railway roundhouse demolition that required cleaning to remove soil and sand deposits both inside and out.  I show an example in this post of what can be done to prepare these for storage and display.  The photograph below, on the left is of a Watkins bottle with the phrase "Container Made in USA" on the bottom underside and "Watkins" in raised letters vertically on one side.  There is a lot of soil and sand mostly on the inside in hard to reach places but also on the outside around the neck, bottom, and raised lettering.  The challenge was to clean up as much of that material as possible.  This prepares the bottle for storage so loose material will no longer fall off due to handling and makes it more presentable for display purposes since the raised lettering and any other embossed marks become more visible.  The following is a list of tools and materials used in the cleaning process:
  • several wooden toothpicks and a shish-kabob stick
  • one tooth brush with soft bristles
  • several Q-tips
  • two soft cloths, cotton
  • one nail file
  • 1/4 teaspoon Orvus soap paste
  • one cup distilled water
Watkins bottle before cleaning
Watkins bottle after cleaning
I used toothpicks to gently pry all the loose soil and sand around any crevices such as at the neck, the bottom and around the raised lettering.  Toothpicks are used because they will not scratch the surface of the glass and the sharp points can reach into very small crevices.  I used Orvus soap and distilled water (discussed in previous posts) with a soft cloth to wipe off the exterior followed by a rinse with distilled water and a different soft cloth.  To get the material from the inside I first used a wooden sish-kabob stick to get into as many of the interior cracks and corners to loosen up the soil and sand.  I then used q-tips attached to the end of the stick to reach the hard to reach sloped parts just inside the top.  The q-tips are cut in half in the middle, attached to the stick and bent back so that when you push them through the neck they will open up enough to rub around the inside loosening the material found there.  The loose material is dumped out of the bottle and then the inside is rinsed with distilled water.  The last step is to rub all around the interior with more q-tips to remove any sheen of dirt or other bits left behind.  I did not use a bottle brush for the simple reason that this is a square shaped bottle.  Bottle brushes are more effective with round bottles.  The photograph below shows the end result of the cleaning.


The photograph below illustrates the tools used in this example and the material removed.  You can see the brown stains on the Q-tips and the pile of sandy soil removed is in the middle.

Bottle cleaning tools, nail file at bottom.
Conservation Tips: I do not use metal tools or abrasive materials of any kind to clean glass objects.  There is a chance that the metal or abrasives could scratch the glass surface.  The wooden picks will not scratch the glass and the nail file is used to sharpen the ends of the wooden picks (they will get dull over time) to reach into crevices to dislodge dirt and to make them easier to fit the picks into the Q-tip ends. 

Thursday, 15 November 2012

Roundhouse Objects Conservation - Nov. 13, 2012

November 13, 2012

I took a break from cleaning ceramics and glass this week to start entering catalogue data onto the Kings County Museum's collections database.  Getting as much information on the museum's objects as we can loaded into the database is very important for anyone wishing to do historical research.  Fortunately, all of the objects donated to the museum from the railway roundhouse demolition came with a catalogue sheet describing the object along with measurements, condition, possible dating, and a few other pieces.  Over time I will add to this information by doing additional historical research, taking high resolution photographs (called record photography by conservators and other professionals), talking to railway objects collectors, visiting other museums with railway collections, and so on.  My objective is to date everything and provide additional resources for those interested in learning more.


We were happy to be able to visit a local collector, Don Foster, arranged by the museum's curator, Bria Stokesbury.  Don has been collecting railway objects for very many years.  He has an amazing collection that follows the development of railways in Nova Scotia.  He has a caboose in his yard that was in use from 1912 until 1976 and which he has done a lot of restoration work.  Because it is mostly wood it requires regular maintenance.  He is a passionate collector with a strong interest in promoting railway history.  Even more importantly to us, he was able to answer all of our questions concerning our railway roundhouse objects and put them into context through his own collection.   We brought with us a box of metal objects that we knew very little about, that we thought were not in good shape and which we could offer to him.  There are two photographs of the objects we brought him that I wrote about in a previous post on October 16.  Here is the link: Roundhouse Objects Conservation - Oct. 16, 2012  (It will open in a new window).


There were several important things he was able to tell us about these objects.  The small bolts with square heads as shown in the photograph below were very important to him to be able to use in repair of his caboose. These bolts are now more difficult to find as they have been replaced in modern times with hex head bolts.

Square- headed wood bolt from old rail car. 
The tool shown in the photograph below was a mystery to us and Don was able to identify it.  It is used to open the bearing box on the axle of a rail car (a small door on the side near the top of the wheels) and then to adjust, remove and/or replace the packing material (with the flat, curved end) within this opening.  Prior to friction bearings it would have been used to make sure that the packing material was in place and oiled properly to ensure it will not overheat.  Overheating could cause serious damage and injury.  It is an object that I will clean up by removing as much of the rust on it as I can and then stabilize it with a thin layer of museum grade wax.

Bearing box maintenance tool in Kings County Museum
Don had a similar tool in his collection and below is a photograph with me holding the museum's and Don holding his.  Don's is somewhat longer, has been cleaned up and the handle is of a slightly different design but it has the same features such as a small tab in the middle of the handle that is used to pry the small door open and a wider, flat, curved end that is used to adjust the packing material.  Thanks to Don we can now make this a show piece in the museum's collection. The likely age of this object is circa 1912 but, I will be confirming this date with future research.  There is a possibility that it could have been hand made.

Comparing bearing box maintenance tools.

Wednesday, 7 November 2012

Roundhouse Objects Conservation - Nov. 6, 2012

November 6, 2012

Ceramics and Glass Cleaning

Cleaned up the last of the ceramics in the collection and started in with the bottles and other glass objects.  One of the ceramics was a plate that had some interesting characteristics.  It had been broken and repaired with a large crack essentially down the middle.  There are patches of glue that squeezed out of the crack and dried.  This same plate had an interesting wear pattern in the middle which can be seen at an angle with a bright light.  The pattern suggests to me that it was likely used as a tray for a milk or water jug which stood in the centre.  Perhaps the person repairing it decided that it could remain useful even with the effort to repair it.  This is conjecture on my part.  Can you think of another explanation?

The glass bottles are especially challenging because most have small openings at the top and were buried in soil so they often have small patches of soil right up underneath the top.  I used a shish-kabob stick with a cut off Q-tip bent back on itself to reach the difficult spots at the base and the top.  In some cases the bottles were rinsed inside only if they did not appear to hold any special remnants of what may have been the original contents.  It is important to keep any  material which may be original content for future testing.  It is not critically important at this time to determine the contents but we cannot be sure if this might be important perhaps 50 or 100 years from now.  Certainly, the testing if done now would be expensive and would not normally be done by a community museum with limited funding for such procedures.

The following photograph gives an example what should be done with material to be kept.  The dark material removed had flakes of lighter shiny material intermixed.  These were not separated out but just carefully kept and stored together.

Material removed from inside bottle with container and label.

Conservation Tip:  When cleaning any object be sure to keep any material removed which may be important for future research.  It must be stored in a container that can be sealed to remain uncontaminated.  The container must be labelled to clearly identify the object it was removed from and any other relevant information.  Some examples of materials which should be kept:

  • the contents of a bottle,
  • flakes and/or pieces of an object which fall off when handled,
  • threads or cloth pieces from textiles,
  • plant material found on exterior or interior,
  • paint flakes.

Tuesday, 30 October 2012

Roundhouse Objects Conservation - Oct. 30, 2012

October 30, 2012

Cleaning Ceramics

With the assessment of the roundhouse objects completed and approval from the curator to proceed the next step is to do the cleaning.  I have concentrated on ceramics in the first phase of cleaning.  In general the ceramics are part of the railway dining car sets that were broken or disfigured and then thrown away.  The cleaning is done in several steps as follows by using:
  1. a stiff brush such as a smaller art painting brush to brush away the loose material,
  2. a wooden pick with a sharp point such as a shish-kabob stick to dislodge dirt from crevices,
  3. a tooth brush to dislodge any more stubborn material,
  4. a soft cloth dipped in soapy, distilled water to wipe off stains, soil,
  5. a second soft cloth to rinse with distilled water.
Conservation Tip:  Be very careful when cleaning to avoid any damage to the makers mark or a registration number often found on the bottom of ceramics such as cups, bowls or plates.  It is best to avoid these to ensure that they will remain readable.  This is also true for all historical objects with any identifying marks such as the owner's initials, signature, and so on which can be found in paper, cloth, leather, glass, and so on.  Any loss of readability is to be avoided since the marks often assist in determining dates, history of use, owner, and/or maker of an object.  The ceramics we cleaned had identifying marks which we left alone as shown in the photograph below.  The makers mark in this case was applied before it was glazed and fired so it is stable but the registration number was added later and is somewhat fragile.

Makers mark in the centre
Registration number in black ink below it
Photographs are taken of all objects before and after with a scale and a label to record the removal of material.  All work is done using gloves and on a base of plastic to control moisture.  The soap is the same one used to clean mouldy textiles - Orvus.  In all cases we were able to remove most of the soil and what looked like rust stains.  Some would not come off with minor amount of pressure so were left as is.  Below are photographs showing before and after with this type of cleaning.  Please note that only a small amount of material was removed in this example as found around the outside edge of the base and around the handle while some of the red marks also came off.

Ceramic cup before cleaning
Ceramic cup after cleaning with
soil bits removed shown on lower right
The following photograph shows three cups that were part of a package that came together.  It shows the tools and materials used to do the cleaning and they show what is an interesting progression of deterioration from the worst to the best.  The coloured band around the upper part of the cup is the best illustration of this - if you look closely at this band in the line up of cups at the top of the photograph you will see how the colour goes from almost completely faded on the left hand cup to bright, vibrant colours on the right.  This begs many questions in terms of the amount of time these objects spent exposed to the elements: whether they were exposed to more or less sun, the effects of soil on the coloured parts, and so on.    Was it exposure to sunlight that faded the colours or exposure to soil or a combination of both?

Tuesday, 23 October 2012

Treating Mouldy Objects - Completed - October 19, 2012

October 19, 2012

Immediately after carefully cleaning and rinsing, the objects treated were hung up outside to dry in the sun for the rest of the day (from 10:30 Am until 3:30 Pm).  Once again, we moved them to follow the direct sunlight since there were shade trees nearby.  When they were brought inside all except one felt dry to the touch.  We did put them out in the sun the next day as well to complete the drying process.  In all cases they were dry to the touch including in all the out of the way places we checked (around folds and peaks on the inside).    Although all visible signs of mould no longer appear we will continue to check them on a regular basis (at least monthly) to ensure there is no additional mould growth.  The black leather gloves continued to have a musty smell which was likely just absorbed due to proximity with the other objects.

The silk insert inside one of the objects was left to dry inside and was dry to the touch by the end of the day. Below is a photograph of the insert showing it removed for cleaning.  The silk is stitched onto a paper backing.  The paper appears to be from a newspaper.

Kings Canadian Hussar's ceremonial hat silk insert 
The objects were all wrapped in acid free paper, stored in banker's boxes, and put away in the museum storage.  A regular check will determine if we have removed the problematic mould infestation.  After several months without evidence of mould growth it would be acceptable to put these objects in with others as part of an exhibit.

Conservation Tip: There are several methods that can be used to remove or reduce the musty odours found on leathers, textiles, and papers .  None of which are guaranteed but might be worth the time, cost and effort.  The best and lowest cost alternative is to place the object in direct sunlight preferably with a breeze.  The sun's ultraviolet light actually will help to break down what is causing the smell.   Keep in mind that some materials will fade with too much sunlight so be cautious and try only a few hours in the sun at first.  Consult a conservator if you are not sure.  Something else you can try which may just reduce odors without having a major effect on what causes them (another lower cost alternative) is storing the objects for a longer period of time in an enclosed container with known odour absorbing materials such as baking soda, charcoal briquettes, or kitty litter.  The objects must not directly contact the odour absorbing materials so put them in an open container inside a larger container that can be closed.  Open it up from time to time (perhaps, weekly?) take the object out and see if the smell is reduced.  It could take several months and is not guaranteed.

Treating Mouldy Objects - Cleaning - October 18, 2012

October 18, 2012

Carefully cleaning the objects to remove any additional mould spores after hanging outside in the sun involves using a soap such as Orvus (similar to Woolite) mixed with distilled water to wash the objects and then rinsing at least twice with distilled water alone.  Washing and rinsing should remove the rest of the mould spores that could be lurking in the materials of the objects.  Damp wiping with a natural sponge dipped in the soapy solution and squeezed to remove most of the moisture will ensure the object is not overly wet.  Do the same when rinsing but use different sponges: a soap sponge and a rinse sponge.  I was very careful with the one object that had several different coloured materials on the inside by using a separate, smaller sponge for each colour.  Testing for colour fastness showed some removal of the colour when rubbed aggressively in non-obvious location with a Q-tip soaked in distilled water.  Being very gentle with the sponge and using different sponges for each colour showed no colour removal.

One of the hats treated has an inside silk insert that was cleaned and rinsed by dabbing with a damp cotton ball.  Since silk is very fragile a wiping motion may have been harmful to the material.  In this case the silk is sown onto a page from a newspaper so I avoided getting it wet.  Excess moisture has the potential to stain the paper.

The first photograph below shows the damp wiping and rinsing in progress.  You can see some of the white mould concentrations on the hat that were removed in this process.  The second photograph below shows the dabbing of the silk insert.

Damp wiping off mould spores with natural sponge
Dabbing silk insert with a cotton ball


Conservation Tips: 1) It is best to immediately hang up the objects again in the sun to dry them out as soon as possible.  Since moisture can reactivate dormant mould spores it is best to thoroughly dry them out right away.  2) Soaps such as Orvus are used because they are more pure than regular soap meaning they are less likely to react negatively with the materials you are washing.  3) Test for colour fastness before washing.  4) In this case (hats) damp wipe instead of immersing them fully in the soapy solution.  There are some cases where a full immersion is warranted.  5) Use natural sponges because they are less likely to have impurities that might affect the materials you are washing.  6) Always wear gloves and a mask plus clean all the tools, containers, and brushes with bleach right after you are done.   The gloves and sponges were thrown away.

Monday, 22 October 2012

Treating Mouldy Objects - Brushing - October 17, 2012

October 17, 2012

Sadly, two of the hats were in very bad shape with a lot of mould visible.  After careful consideration, advice, and discussion it was decided to deaccession them and concentrate on saving the rest of the objects.  These were from the second world war and would have been very difficult to clean.  Some of the reasons why they were removed is: 

1) there are already examples of these within the museum's collection,
2) it is especially difficult to remove large concentrations of mould without damage to the object,
3) the mould has already caused damage,
4) fur on the hat at the bottom is difficult to clean.  

Below is a photograph of these showing their complex nature and the heavy concentration of mould.

Hats deaccessioned (thrown away) due to mould damage

The objects to be treated consist of the following:
  1. Kentville Police Chief's hat circa 1950-1960's
  2. Kings Canadian Hussars dress cap circa 1900
  3. Junior Officer's service cap circa 1972
  4. Kings Canadian Hussars wool service cap 1904 - 1939
  5. Royal Canadian Navy sailor's cap 1941 -1945
  6. Swagger Stick 1950
  7. Black leather gloves circa 1920's   
The first step in treating mouldy objects is to put them into direct sunlight preferrably on a windy day.  The sunlight will help to kill the mould spores while the wind will help to dislodge and carry away the loose mould spores.  The second step is to brush the objects with a small paint brush that has medium soft bristles to help dislodge the mould spores.  Mould spores naturally occur in our environment and are normally all around us so all we are doing is removing concentrations of them on these objects.  It is the concentration of it that cause harm to the objects especially fragile textiles.  In the photograph below this hat and the long leather gloves were the only objects that had visible concentrations of mould spores but we treated all of the objects stored together with them.

Conservation Tips: 1) Do not put silk objects or any part of an object that is silk into direct sunlight.  Sunlight and many other sources of light has a cumulative effect on silk and will accelerate its breakdown over time. 2) As shown in the photograph below wear a mask, gloves (latex or rubber), and do not put objects anywhere near air vents or open windows into a building.  3) Clean all objects in any group stored together where one or more show evidence of mould spores.


All the objects were carefully hung up on a line in sunlight for the whole time that the museum was open and were brushed a second time later in the day.  The line with objects had to be moved along to follow the sun due to shade produced by trees.  Here is a photograph of the objects being hung up with clothes pins.

Friday, 19 October 2012

Treating Mouldy Objects - Planning - October 17, 2012

October 17, 2012

Several objects stored in the Kings County Museum started showing evidence of mould growth.  This was discovered by the curator and immediately dealt with.  The curator inspects objects at least twice every year watching for possible mould growth in order to catch it and deal with it before it spreads.  This is an ongoing issue in many museums and requires extra diligence.  All objects must be quarantined when they are donated to the museum for a period of time usually one or two months.  They are examined regularly and only enter the permanent collection when they show no evidence of mould or insects.  In Nova Scotia (as in United Kingdom) where the average annual relative humidity (RH) is over 80% mould growth can happen at any time.  General collections of objects are best stored at 65% RH.
I put together a list of steps to take in terms of cleaning up this mould outbreak.  The steps are based on a combination of advice from the Senior Conservator at Nova Scotia Museum, internet research, and my studies at the university.  The objects were bagged in plastic and stored in a freezer then removed and kept in room temperature still bagged for at least 24 hours beforehand.  The following steps were discussed and approved by the curator before proceeding:
  1. hang up the objects on a line outside in direct sunlight preferably with a bit of wind for 6 to 8 hours - make sure that they are not hung up near intakes for air conditioning or open windows into the building
  2. brush off the objects with a soft, small paint brush first one direction and then the other - repeat this step after 2 or 3 hours - when done, brush must be soaked in bleach and water solution for at least 20 minutes, rinsed and dried OR thrown away
  3. mix Orvus soap (discussed in previous post) with distilled water in a small bowl using only one teaspoon or less of soap, thoroughly mix it
  4. using a natural sponge lightly damp wipe the object with the Orvus solution first one direction and then the other - sponge must be soaked in bleach and water solution for at least 20 minutes and dried when done OR thrown away
  5. using a natural sponge lightly damp wipe the object with distilled water first one direction and then the other
  6. repeat above step
  7. hang up the damp objects on a line outside in the sun for several hours until thoroughly dry (again, windy would be best
Note: latex gloves and a face mask were used for all steps where mould spores may be present. 

The objects in question were a collection of military hats primarily from World War II but of particular interest is one from the Boer War which is over 100 years old.  Below is a photograph of all of the objects.  Later photographs will show them in more detail.


Wednesday, 17 October 2012

Roundhouse Objects Conservation - Oct. 16, 2012

October 16, 2012

Assessment Finished

 I completed the assessment of all the railway roundhouse objects and am preparing the spreadsheet with the information needed by the curator to discuss and approve the steps to proceed.  In general, the conservation will be basic cleaning, stabilization of most of the metals but not the very large ones, preparation of storage materials, and entering the data on the collections database.  More on this in a later BLOG.


The two photographs above show a group of objects that will not be conserved but will be given away to local railway history collectors.  The reasons for giving them away:
  1. they are considered not "historically significant",
  2. they are in considerably bad shape - lots of corrosion which is heavily flaking as seen in the photographs,
  3. they are in some cases duplicates of objects already in the museum's collection,
  4. they will save space in storage in a limited storage area (this is common in community museums).
In November 2012 the curator and I will travel to a nearby railway collector and offer these objects to them.  I am looking forward to this as part of my education on the history of the Dominion Atlantic Railway.  The history will help me fill out the historic records for these objects and becomes part of the body of work kept at the museum and stored electronically on the collections database.

The next step, beginning next week, is to start the conservation work.  This will mean cleaning all the objects using fine brushes, cloth, and soap for surface cleaning. Distilled water will be used for rinsing and for mixing with the soap.

Conservation Tip: Many objects can be washed or damp wiped with soaps that are pure in nature.  That is, do not have any other chemical additives such as dyes.  Orvus is an example of a synthetic, neutral, gentle, effective cleansing agent and is often used to wash or damp wipe or soak textiles of all kinds such as quilts but must be used carefully since some colour dyed materials have the potential to run.  Any coloured materials must be tested for colour fastness first before proceeding.  Usually I will soak a Q-tip in distilled water and rub it with moderate pressure on coloured material in an area not readily visible.  If any of the colour rubs off on the Q-tip I will not clean that coloured area.  Please check the Material Safety Data Sheet  (MSDS) of any cleansing product to determine safe handling and potential health issues before proceeding.  This web page has that information for Orvus and where to obtain it

http://www.pgpro.com/Default.aspx?tabid=88&product=93

Friday, 12 October 2012

Roundhouse Objects Conservation - Oct. 9, 2012

October 9, 2012

Assessment (Continued.....)


Large locomotive wrench
I finished off assessing the large group of objects including this large wrench shown on the right which was used on locomotives.  The scale in the photograph (black and white bar at bottom centre) is 11 cm (about 4 inches) long which shows how large it is.  There are yellowish white pock marks on the wrench which are of unknown origin.
Heavily corroded padlock
There is a very corroded (rusted) padlock shown on the left that may have a makers mark that could be revealed by removing the loose layers of corrosion.    Once again, makers marks can help provide history of the object and date it.  The padlock is frozen in the position shown - it does not move when minimal pressure is applied.

There were two glass objects assessed: a clear glass lid for a compote jar and a glass insulator for a power line.  It is not clear if the glass lid was imported from elsewhere or made locally.  It may be possible to determine this when it is cleaned and compared to some similar objects currently in the museum's locally made glass collection.

Conservation Tip: For all metals I am proposing that I remove all loose rust and apply a fine layer of museum grade wax heated with a hair dryer and applied with a brush.  This will stabilize the object to avoid it deteriorating any further.  In the top photograph you can see some flecks of corrosion which come off when handled.  This would not happen if treated as I propose.  The coating of wax would block contact with moist air yet allow the object to be viewed.  The wax is easily removed by reheating with a hair dryer and wiped off with a clean cloth.  There were two other metal objects assessed at the same time: a brake wheel and three rail spikes.  All will require the same treatment.  Caution: Most metals expand when heated and contract when cooled so it is important to make sure that the metal objects are stable and can withstand a minor amount of heat such as with a hair dryer.


Tuesday, 9 October 2012

Roundhouse Objects Conservation - Oct. 2, 2012

October 2, 2012

Assessment (Continued......)

Roundhouse Objects Large Group
Continued with the assessment of the large group of objects as shown on the left.  I am working in numerical order from the documentation provided by the environmental review company and mostly  from left to right in this photo.  I got through 12 objects which were mostly part of the tea serving sets used on the Dominion Atlantic Railway. As I work my way through these it is obvious that cleaning and proper storage will be most important.  Cleaning will provide the following benefits: preparation for storage, no more loss of material with handling, and uncover makers marks.  Storage is critically important to these objects because they are fragile and currently are only wrapped in thin white or brown paper and loosely placed in a large plastic box.  The objects do not roll around or knock against each other in the box, they are somewhat firmly packed in.

Conservation Tip: I will recommend that each object be wrapped in cotton batton and placed in a better box.  Both boxes and cotton batton can be easily and cheaply obtained at a local dollar store.  I would also recommend this for anyone at home who may have fragile objects stored away.  Although using acid free boxes for storage and the use of museum grade materials of all kinds would be better they are much more expensive.

Several of these pieces have makers marks which can be used to research the supplier.  It is this research that can shed light on the manufacture and usage of these which can also shed light on local customs.  Certainly, the more expensive the ceramics the more wealthy and the higher the social status of the client.  There are similarities in the makers marks in this collection but some variations.  Perhaps they were purchased at different times and may reflect change in ownership of the company that made them.  All appear to have been made in the United Kingdom.  Since the railway was in operation from the late 1890's until the 1960's there will be some supplier history available.  In the earlier years of operation a more wealthier client could afford to take the train from Yarmouth to Halifax and beyond while dining in the dining car and enjoying the view out the window of the beautiful Annapolis Valley.  Below is an example of a makers mark - Grindley England Vitrified supplied by Nerlich & Co - on a butter dish.  Nerlich & Co was an importer based in Toronto that was active from 1858 until at least the 1940's.

Butter Dish with makers mark